
Setting up the Admin API
{% include_relative nav.html selected="admin" %}
In previous sections, we have implemented conferencing apps for Android, iOS, and Web. In all these apps, we have used the Admin API which is already hosted at https://app.mesibo.com/conf/api.php so that you can quickly play with the apps without worrying about the backend. Now in this part, we will describe how to host the Admin API backend on your servers/infrastructure and having complete control over your conference participants, the resolution of the room, who are allowed to publish or view streams in the conference, etc.
Configuring Admin API in demo apps
If you are hosting the Admin API on your own server, say at https://example.com/api.php. Then, you need to configure the demo apps accordingly. The demo apps are using the Admin API which is already hosted at https://app.mesibo.com/conf/api.php.
Android
public String demo_backend_api_url = "https://app.mesibo.com/conf/api.php";Refer to the source code hereopen_in_new
iOS
{% highlight objc %} mApiUrl = @"https://app.mesibo.com/conf/api.php"; {% endhighlight%}
Refer to the source code hereopen_in_new
Javascript
const MESIBO_API_BACKEND = 'https://app.mesibo.com/conf/api.php';Refer to the source code hereopen_in_new
Prerequisites
Before we dive into setting up the Admin API for the Conferencing app, please ensure that the following servers are running.
- A webserver with HTTPS and PHP support. Depending on the webserver (apache / h2o/ Lighttpd/ Nginx) you are using, the setup varies. In the subsequent examples, we will assume that your hostname is
example.comand the Admin API which you will download soon is accessible via URLhttps://example.com/api.php - MySQL server
- Downloaded the Admin API source code from Githubopen_in_new
- mesibo account and App token
Setup mesibo Account and Generate an App Token
Login to
Mesibo consoleopen_in_new and create a new application. For example, ConferencingApp. This mesibo application will host all your users and groups. Once you create a mesibo application, you will get an App Token that you can use to create access tokens, groups, and other administrative tasks using the mesibo backend APIs.
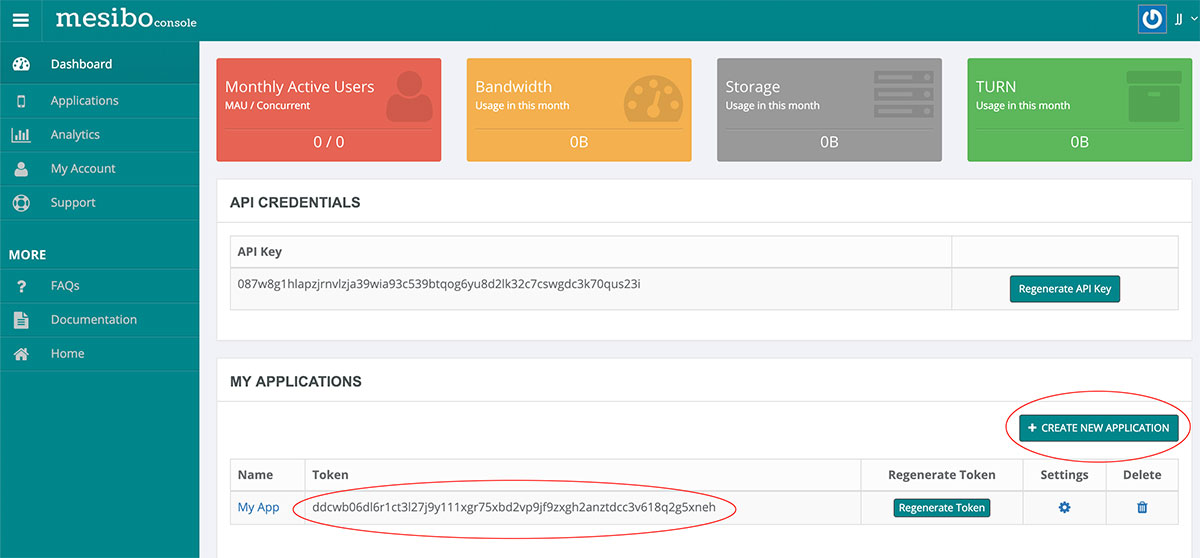
Once your application is created, note down the App token. The App Token looks like the following:
cn9cvk6gnm15e7lrjb2k7ggggax5h90n5x7dp4sam6kwitl2hmg4cmwabet4zgdwWe will need this App Token to create users and groups for this Application.
App Token is secret and you should never expose it to your users. Hence, you MUST NOT use it in client-side APIs (Android, iOS, JS, etc)
Setup Database
The conferencing app requires a database to store all the users, conference rooms, and participants. The Admin API code comes with a SQL file that you can use to create a database or use any existing database if you wish. The database schema is available in an SQL file backend/db.sqlopen_in_new. Run the following command to create the database schema for the Admin API.
$ cd backend
$ mysql -h <host> -u <username> -p <password> <dbname> < db.sql
Setup REST API
The next step is to set up REST APIs which will be used by the frontend for login, setting up conference rooms, participants joining conferences, etc. The REST API code is available in the backend folder which you need to host on your webserver. If you are not familiar with hosting a web server, refer to any of the excellent tutorials available online, with step-by-step instructions on hosting a web server backend.
Before you can go live with your REST API, you need to configure the following:
- Database Information
- Mesibo App Token — since the conferencing app uses Mesibo API, you need to sign up with mesibo and get an App token. You can sign-up here — https://console.mesibo.comopen_in_new. Once you signup and login, create an application that will give you a mesibo App token. Refer to Get-Started Guide
Now edit config.php and enter your database credentials & mesibo app token. If you plan to use Captcha, you need to get Google Captcha Key as well and configure it here.
<?php
$db_host = “164.52.xxx.xx”;
$db_name = “confdemo”; // the name of the database to connect to
$db_user = “confuser”; // the username to connect with
$db_pass = “confpass”; // the user’s password
// OBTAINED BY SIGNING AT mesibo.com
$apptoken = “<get yours from https://console.mesibo.com >”;
Once the REST API is live, you can use it in the app to perform the following operations:
Log-in
The login REST API is implemented as an example here. When this API is invoked on your server, it validates the email and the OTP-code. It then uses
mesibo User Management API to create a mesibo user and get an access token. You can refer to the source code
hereopen_in_new for an example of how once the email-based verification is complete, it creates a mesibo user.
It takes the following parameters:
- appid, Mesibo Secret Application ID
- name, User name
- email, User email
- code, The OTP sent to user's email
- captcha, [optional] If required, you can use a captcha token
For example, To register a user's email and send an OTP
https://example.com/api.php?op=login&appid=xxxxxx&email=john@doe.com&name=JohnTo validate the email using the OTP, and generate an access token
https://example.com/api.php?op=login&appid=xxxxxx&email=john@doe.com&name=John&code=123456Response:
Contains a user access token, if login is successful like below.
{
    "op":"login",
    "ts":1617695188,
    "token":"xxxxx",
    "name":"test",
    "address":"a5aa14e900dc7a12fb2c0f59c993a0d8eca6d5ca",
    "uid":"201236",
    "result":"OK"
}
Create a Room
To create a Room, with a desired name and resolution, we have implemented the setgroup REST API as an example. After it is invoked on the server, it uses
mesibo Group Management API to create a mesibo group. It also generates a pair of random numbers: pin and spin using which a user can join a room. You can refer to the source code
hereopen_in_new to see how this is done.
It takes the following parameters:
- token, User access token
- name, Room name
- resolution, Room Resolution. It can be one of the following:
0, Default1, QVGA2, VGA3, HD4, FHD5, 4K
- captcha, [optional] Captcha token
For example,
https://example.com/conf/api.php?token=xxx&op=setgroup&name=myteam&type=0&resolution=0Response:
Contains Group-Info(gid, name, etc), pin, and spin(subscriber-only pin) like below. The user will need to use the gid and pin or spin to join a room.
{
    "op": "setgroup",
    "ts": 1617695399,
    "gid": 114367,
    "name": "myteam",
    "type": 0,
    "resolution": "0",
    "publish": 1,
    "pin": "54322364",
    "spin": "68067665",
    "result": "OK"
}
Join a Room
To join a Room, with a certain gid and pin we have implemented the joingroup REST API as an example. After it is invoked on the server, it validates gid and pin to see if they match. Then, it uses
mesibo Group Management API to add the user as a member to the group. Refer to the source code
hereopen_in_new to see how this is done.
It takes the following parameters:
- token, User access token
- gid, Group-ID
- pin, The pin to access the group
- captcha, [optional] Captcha token
For example,
https://example.com/conf/api.php?token=xxxx&op=joingroup&gid=114367&pin=xxxxxxResponse:
Contains the Group-Info(gid, etc) if successful, like below. Using this gid, the participant can join the group call using the real-time conferencing API.
{
    "duration":"0",
    "gid":"114367",
    "name":"myteam",
    "op":"joingroup",
    "pin":"xxxxx",
    "publish":1,
    "result":"OK",
    "spin":"xxxxx",
    "ts":1617695828,
    "type":"0"
}
Existing rooms
When a user creates/joins a room, they will become a member of a mesibo group. A user can get a list of all rooms/groups that they are part of using the rooms API.
It takes the following parameter:
- token, User access token
For example,
https://example.com/conf/api.php?token=xxxx&op=roomsResponse: An array of rooms like below
{
    "count":10,
    "op":"rooms",
    "result":"OK",
    "rooms":"[{…}, {…}, {…}, {…}, {…}, {…}, {…}, {…}, {…}, {…}]",
    "ts":1617696062
}