
Installing mesibo on-premise as Linux service without using Docker
If you are an experienced Linux user, you can install mesibo on-premise with web-based control panel on your Linux server directly (just like any other software) without using docker. We earlier offered Amazon EC2 AMI created using this approach. However, since many mesibo users use other hosting providers, we are making all the steps, and scripts available in this document.
The Pros and cons of this approach are:
Pros
- Simplified setup (networking, file system access, etc)
- Control mesibo using Linux service manager
systemctlthat provides more flexibility compared to docker - [Optional] web-based control panel to configure and control (start/restart/stop/update) mesibo
- Slight performance advantage.
Cons
- Limited Distributions, unlike the mesibo docker image which supports almost all Linux distributions, this approach is supported only on RHEL8 (Ubuntu soon) based distributions.
Prerequisites
It is required that you refer to and try Docker-based installation first before you attempt this.
- Server running RHEL8 / Rocky Linux 8 / Oracle Linux / Other variants. Note that CentOS 8 has reached End Of Life (EOL) on December 31st, 2021, and hence it is not recommended for new installs.
- Working knowledge of the Linux command line and setting up MySQL and NGINX server.
- NGINX Web Server
- MySQL 8 (recommended) or MariaDB 10
- git
- All commands MUST be run as the root user. Log in as root (or use
sudo).
mesibo on-premise setup with web-based control panel
The following image shows the mesibo on-premise setup with a web-based control panel.
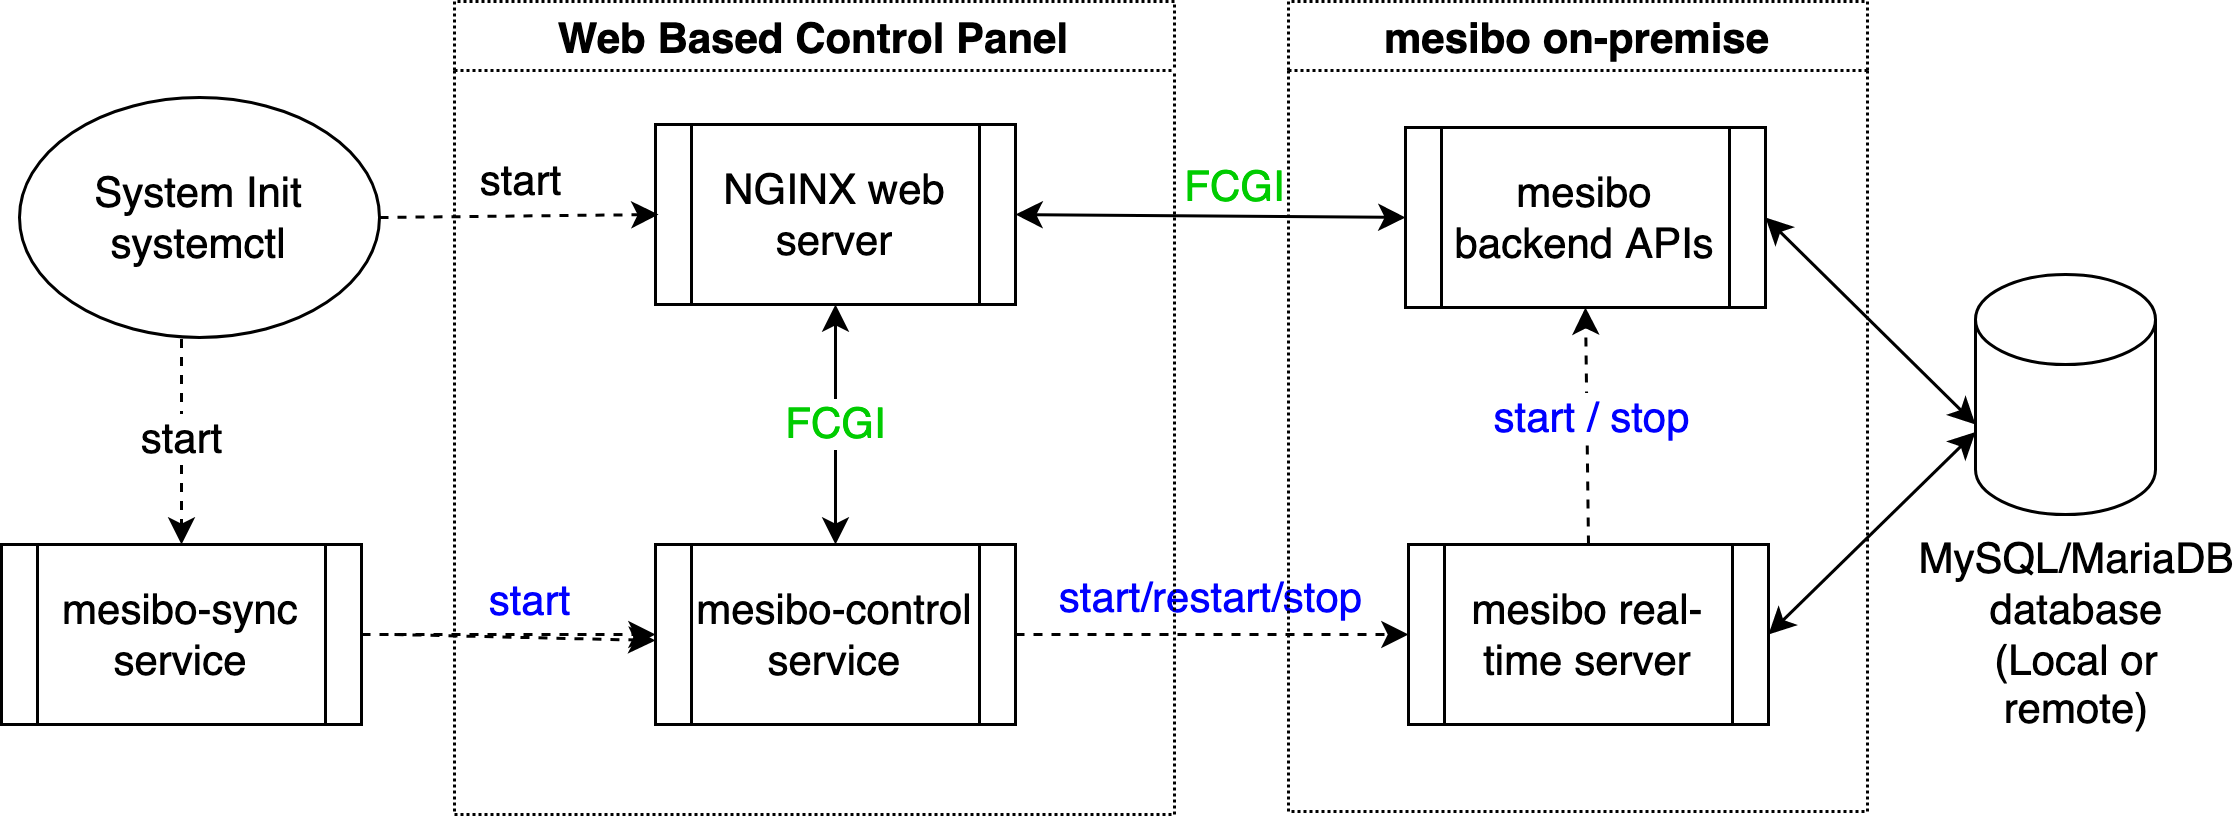
The web-based control panel is used for the mesibo configuration and also to start, restart, stop or update mesibo on-premise server. It is optional and you can remove it if you do not require it, however, we recommend that you keep it.
Nginx web server used for accessing web-based control panel and mesibo backend APIs. Although we have only described the Nginx setup here, you can use any web server of your choice.
Installing mesibo
You can use a script to download mesibo on-premise from GitHub and install it.
Run the following command to download and execute the script. Alternatively, you can download and modify the script before executing it.
curl -s https://raw.githubusercontent.com/mesibo/on-premise/main/bin/mesibo-sync.sh | sudo bash -sThe script will install the necessary software and will install three services
- mesibo-sync, which keeps the mesibo on-premise updated and runs the web control panel on system init / boot.
- mesibo-control, which is a fast CGI backend that takes command from the webserver to configure and control mesibo on-premise server
- mesibo on-premise server with backend APIs
Once the installation is over, you can execute ps to confirm that mesibo-control service is running
# ps aux | grep mesiboConfiguring NGINX Web Server
You need to add the following configuration in your /etc/nginx/nginx.conf.
root         /mesibo/git/on-premise/control-center/;

include /etc/nginx/conf.d/*.location;

location /control {
	fastcgi_param SCRIPT_FILENAME $request_filename;
        include        fastcgi_params;
        fastcgi_pass   127.0.0.1:32768;
        client_max_body_size 2048;
}

location /mesiboapi {
        fastcgi_param SCRIPT_FILENAME $request_filename;
        include        fastcgi_params;
        fastcgi_pass   127.0.0.1:32770;
        client_max_body_size 8192;
}
You can either edit the exisitng /etc/nginx/nginx.conf file or overwrite it by copying from /mesibo/git/on-premise/install/nginx/nginx.conf
# /bin/cp -f /mesibo/git/on-premise/install/nginx/nginx.conf /etc/nginx/nginx.conf
# /bin/cp -f /mesibo/git/on-premise/install/nginx/conf.d/letsencrypt.location /etc/nginx/conf.d/
Restart the Nginx server after the configuration
# systemctl restart nginxYou should be able to access the control panel at http://<IP Adress>/control
MySQL
If you prefer to use the database on the same server, you need to install and configure the MySQL server. You also need to create a database mesibo.
Run the following command to download and execute the script which will install the MySQL server. Alternatively, you can download and modify the script before executing it.
curl -s https://raw.githubusercontent.com/mesibo/on-premise/main/install/install-mysql.sh | bash -s If you are using an existing MySQL server, you don't need to install MySQL server on this host. However, you need to ensure that the following lines are present in /etc/my.cnf.d/mysql-server.cnf
innodb_buffer_pool_size=16G
max_connections = 4096
local_infile=1
sql_mode = "STRICT_TRANS_TABLES,ERROR_FOR_DIVISION_BY_ZERO,NO_ENGINE_SUBSTITUTION"
Replace 16GB in above configuration with 70-80% of RAM in your MySQL server.
Run the following commands to disable MySQL password policy
mysql -e "uninstall plugin validate_password"
mysql -e "UNINSTALL COMPONENT 'file://component_validate_password'"
Viewing Logs
mesibo on-premise writes logs into /var/log/mesibo/logs file.
You can view live logs using
$ sudo tail -f -n 200 /var/log/mesibo/logsmesibo moves previous logs to /var/log/mesibo/ directory in a file having the name pattern logs-YYMMDD-*.