
Mesibo On-Premise - Installing & Running Mesibo on your own premise or private cloud
Mesibo On-Premise solution allows you to run the entire Mesibo real-time platform in your own premise OR private cloud. All the messages and calls go through your own data center and stay in your own database. All you have to do is download Mesibo On-Premise and run it in your own data center. That's it!
Why On-Premise
Although our cloud services let you start immediately, there are several reasons why you should consider On-Premise.
Privacy and Data Security
One of the key reasons is to have ultimate control over your data. More than ever before, it has become imperative to protect and be more sensitive towards your user data - be it personal data, financial data, medical records, and also other reasons like GDPR, HIPPA, unauthorized harvesting of your data, companies selling, misusing your data for advertisement, to name a few. Cambridge Analytica Scandal is an example that your data is most safe when it’s within your control.
Mesibo On-premise offering puts you complete control of your data since everything runs on your own servers or private clouds. All the messages and calls go through your own data center and stay in your own database. And hence mesibo or anyone else have absolutely no access to the data.
Extendibility and other Technical Advantages
On-Premise offers many features which are not possible with the cloud deployment. For example, loadable modules that let you load your own code and enable tighter integration with your backend. You can interface Mesibo On-premise solution with machine learning and AI tools like Tensorflow, Matlab, and much more. Refer tutorials for more details.
Pricing
Pricing is the most salient part of our On-premise offering. It comes to you at no additional cost - you only pay for the number of active users per month! No monthly commitment, no bandwidth charges, no storage charges, or any other hidden charges. This makes On-premise even more economical and attractive than our Cloud offering.
If you do not wish to host Mesibo on your own server infrastructure, you have the option of using the Cloud offering by Mesibo. Also, even when running On-Premise, you can always use Mesibo cloud as a back-up, gives you best of the both worlds.
Features
- All Mesibo features, including Messaging, Voice, and Video calling, Chatbots running from your own premise
- Complete control over your data. All the messages and calls route through and stay in your own infrastructure
- Unlimited bandwidth and Messages
- Unlimited storage and data retention
- Private and public deployment
- Auto fallback to Mesibo cloud as a back-up, if required
- Push notifications
- Loadable modules and scripting
All these at no additional cost
Prerequisites
Before we dive into installing and running mesibo On-Premise Platform on your server, ensure that you are:
Familiar with mesibo API and already using mesibo on our cloud services. If not, please refer to getting started guide and tutorials to familiarize yourself before setting up mesibo On-Premise.
Familiar with setting up a Linux server and MySQL database. If not, refer to online tutorials for the Linux distribution of your choice.
Although not essential, basic knowledge of setting up Docker and using Docker containers would be helpful. You can refer to Docker documentationopen_in_new and various online tutorials on Docker.
Server Requirements
Mesibo On-Premise Platform requires the following:
- Linux 64-bit server (or an always-on instance) with at least 4GB of free RAM. Mesibo supports all the major Linux distributions that support docker. It is tested on the following distributions
- RedHat / Rocky / Oracle / CentOS 8.x and later
- Ubuntu 20.4 and later
- Mint
- Debian
- Fedora
- SLES
- MySQL (or MariaDB) database 8.x and later. Ensure to disable MySQL strict mode. mesibo will create necessary tables in the database and hence you do not need to worry about the database schema. It is recommended to run MySQL on a separate server with SSD and at least 8GB of RAM dedicated to the InnoDB cache.
- RAM - Approx 2KB per user and 4KB per simultaneous connection.
- CPU - mesibo is very lightweight and hence any reasonable modern-day CPU should be good enough. mesibo on-premise has been load tested for 1 million phantom users load on a normal dedicated server with intel i7 6700. Note that we do not recommend running it on VPS, unless you are deploying it for a fairly low number of users, say a few thousand. If you are deploying on the cloud, your instances must be always on. You can perform your own load testing to find a suitable configuration.
Should I recompile my apps to work with Mesibo On-Premise?
Definitely not. If your apps are using latest Mesibo APIs, you only need to configure your On-Premise server in Mesibo Consoleopen_in_new and tell Mesibo to redirect all your users to your own server. All your users will immediately stop using Mesibo cloud servers and start using your own servers. Rest everything remains the same.
Mesibo cloud servers use the same software as On-Premise. So whether you use Mesibo Cloud Service or setup a dedicated server running Mesibo On-Premise, there is absolutely no change in the way you use Mesibo APIs or deploy your application. In fact, in case your data-center has issues, you can always have the option of falling back to Mesibo Cloud Services, with just the click of a button.
Setting up Mesibo On-Premise
Although Mesibo is a highly sophisticated piece of software, we have ensured that it is straightforward to set up. You only need to provide bare minimum information about where the On-Premise platform should save the data (your database), Mesibo will take care of the rest.
To setup Mesibo On-Premise, follow the steps below:
Step 1 - Install Docker
Mesibo On-Premise server is distributed as a docker image so that you can easily install it on most Linux distributions. All you need is to install Docker to run it. If you have already installed and running Docker on your server, you can skip to Step 2.
You can install Docker by running the command below:
$ sudo curl -sSL https://get.docker.com/ | sh
Once Docker is installed, you need to start the Docker daemon. Most Linux distributions use systemctl to start services. If you do not have systemctl, use the service command.
systemctl:
$ sudo systemctl start docker
service:
$ sudo service docker start
Once the installation is over, you can verify it by running
$ sudo docker run hello-world
It should show something like:
Hello from Docker!
This message shows that your installation appears to be working correctly.
Step 2 - Download Mesibo On-Premise Platform
Download Mesibo On-Premise docker image by running the following command
$ sudo docker pull mesibo/mesibo
This will download and install Mesibo On-Premise platform on your server. However, before we launch it, we need to configure mesibo in the Mesibo consoleopen_in_new.
Step 3 - Configure Mesibo On-Premise
As mentioned earlier, Mesibo made On-Premise configuration straightforward. You don't need to wrestle with complicated configuration files. Instead, the complete On-Premise configuration is done through Mesibo Consoleopen_in_new. All you need to do is to pass your app token to Mesibo On-Premise server, and it will automatically fetch and configure the entire server for you.
Login to Mesibo console, and select the application you want to configure on your On-Premise host. Make a note of the app token. You need to use this app token later to run Mesibo On-Premise Server.

Now, Go to App Settings → On-Premise Hosting in Mesibo Console. Here you will find two sections: Enable On-Premise and On-Premise Configuration. Enter all the required configuration for your On-Premise setup in the configuration section.
Warning: DO NOT turn ON the
Enable On-Premiseswitch before configuring and running Mesibo On-Premise.
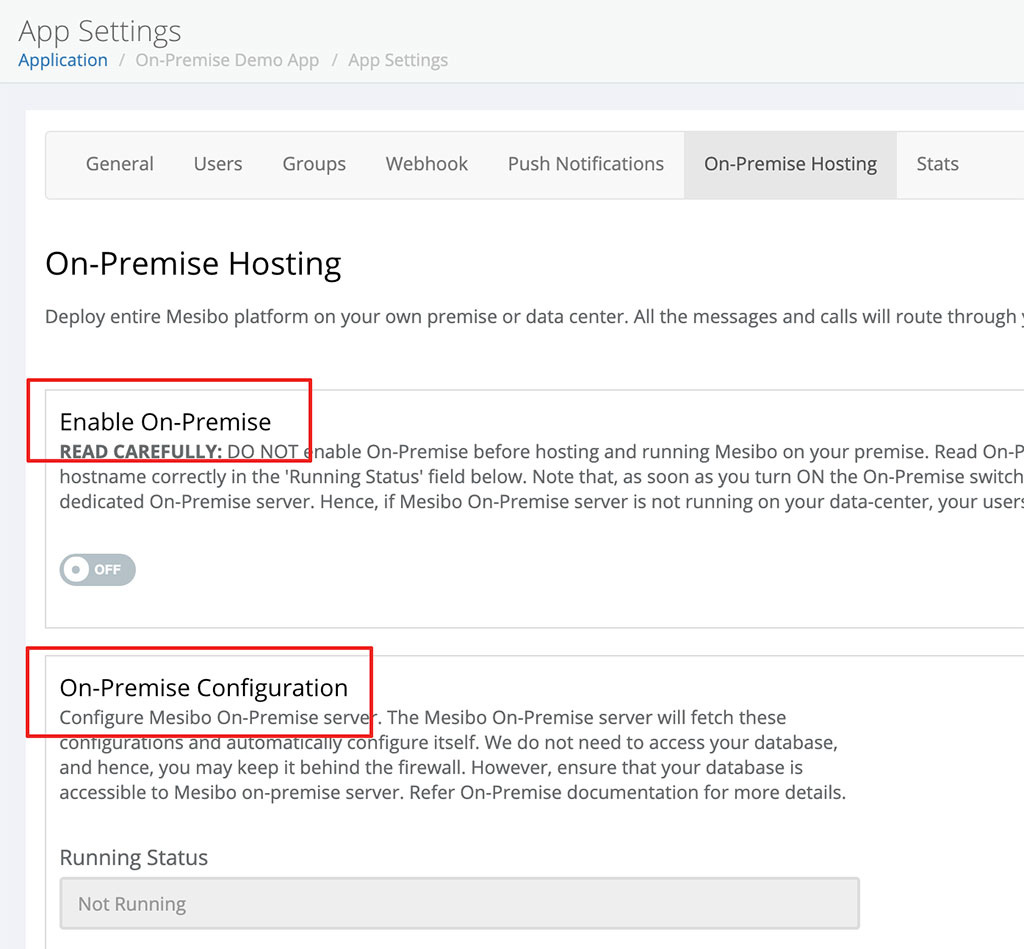
Following are the configuration entities:
- Database Information - You will need a database for Mesibo, and a user who has all privileges for accessing and modifying it. Mesibo requires this information (database host, name, username and password) to access the database. Note, do not use
127.0.0.1as your database host.
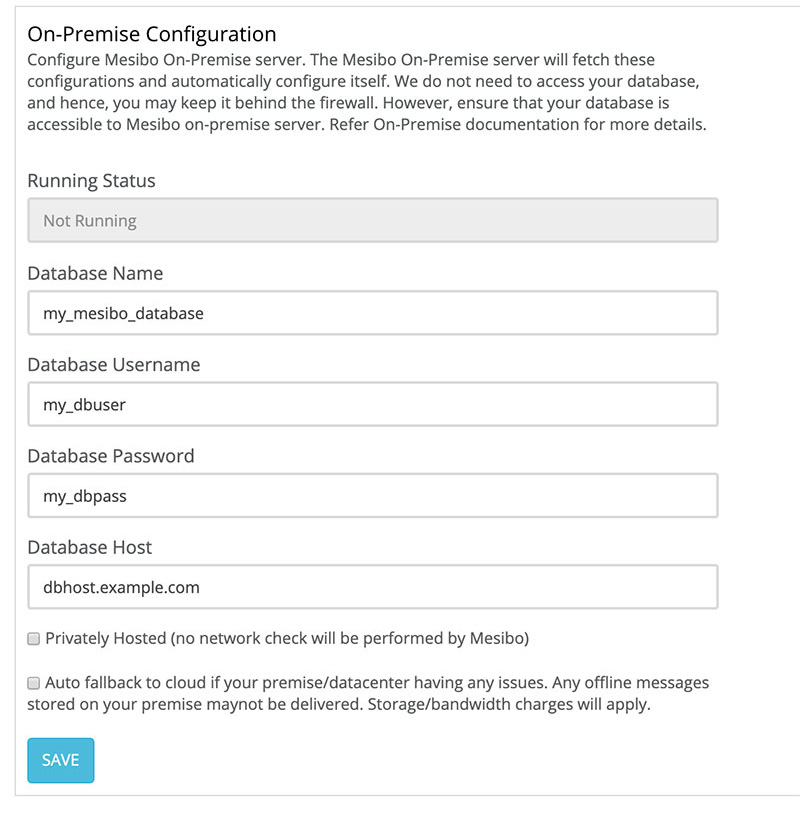
There are two more configuration checkboxes which you can enable if required:
Privately Hosted - In this mode, mesibo console will not check for the correctness of hostname, or any network connectivity. Select this if you are running Mesibo On-Premise in your private network/intranet setup.
Auto Fallback - Enable this if you want to fallback to cloud when your data-center is having an issue. Note that, some of the offline messages will not be delivered in fallback mode since Mesibo cloud has no access to your database.
Step 4 - Configuring TLS Certificate
Mesibo uses the latest Transport Layer Security (TLS) which is the successor to SSL. To enable TLS, you need to configure a valid TLS certificate with your Mesibo On-Premise installation.
Although Mesibo can automatically generate a self-signed certificate for you, it is recommended that you configure a valid CA-signed certificate. This is especially required for JavaScript SDK since all the major web browsers will throw a warning when using a self-signed certificate.
You can use any existing certificate which you are using with your web server, OR purchase it from any provider of your choice, OR use Letsencryptopen_in_new which is a free service (recommended) to get a secure certificate.
mesibo loads TLS/SSL certificates from /certs folder inside the docker container. To configure your certificate, you need to map a folder on your host containing your certificate files to /certs folder using -v option as shown in the next step. You need to ensure that the folder contains all your certificate file - certificate (cert.pem), private key (privkey.pem), and CA chain (chain.pem) files. For example,
$ ls /etc/letsencrypt/archive/mesibo.example.com/
README  cert.pem  chain.pem  fullchain.pem  privkey.pem
Note that the wild card certificate is not supported currently.
Step 5 - Run Mesibo
You are now all set to run mesibo on-premise. You will notice that the Running Status field in console showing "Not Running".
You can now run Mesibo using following command (recommended):
$ sudo docker run -v /etc/letsencrypt/archive/mesibo.example.com:/certs --net=host \
	--ipc=host --name mesibo --rm -d mesibo/mesibo <APP_TOKEN>
You need to specify the APP_TOKEN which you noted in Step-3 above. For example,

For example,
$ sudo docker run -v /certs:/etc/letsencrypt/archive/mesibo.example.com --net=host \
	--ipc=host --name mesibo --rm -d mesibo/mesibo xhc2sayx05ba2l5cralockbicqjsvv1nsqxs0x1yclfv0qvyg1q
On sucessfull launch of Mesibo, the output log should look like below:
E3108-082633-480 (1): Mesibo Build: Aug 29 2020 15:39:08
E3108-082633-506 (1): PID: 1
E3108-082633-775 (1): Local IP Address: 1.2.3.4
E3108-082634-580 (10): *** onp_message: On-Premise not enabled - login to Mesibo console to enable it
E3108-082634-639 (10): Generating TLS certificate for 192.168.0.107
I3108-082635-167: Starting mesibo
You can view logs using
$ sudo docker logs <CONTAINER_ID>
You can find the CONTAINER_ID using docker ps command as shown below:
$ sudo docker ps
CONTAINER ID        IMAGE                 COMMAND                  CREATED             STATUS              PORTS               NAMES
7508d3d78992        mesibo/mesibo  "/mesibo/bin/mesibo …"   8 seconds ago       Up 7 seconds                            mesibo
You can also view logs using
$ sudo docker logs mesibo
If your logs contain any errors indicating failure to start Mesibo, refer to the troubleshooting section.
Now, check Running status of your server from the Mesibo console → App Settings → On-Premise Hosting. If successful, the Running Status field will contain your hostname instead of Not running.
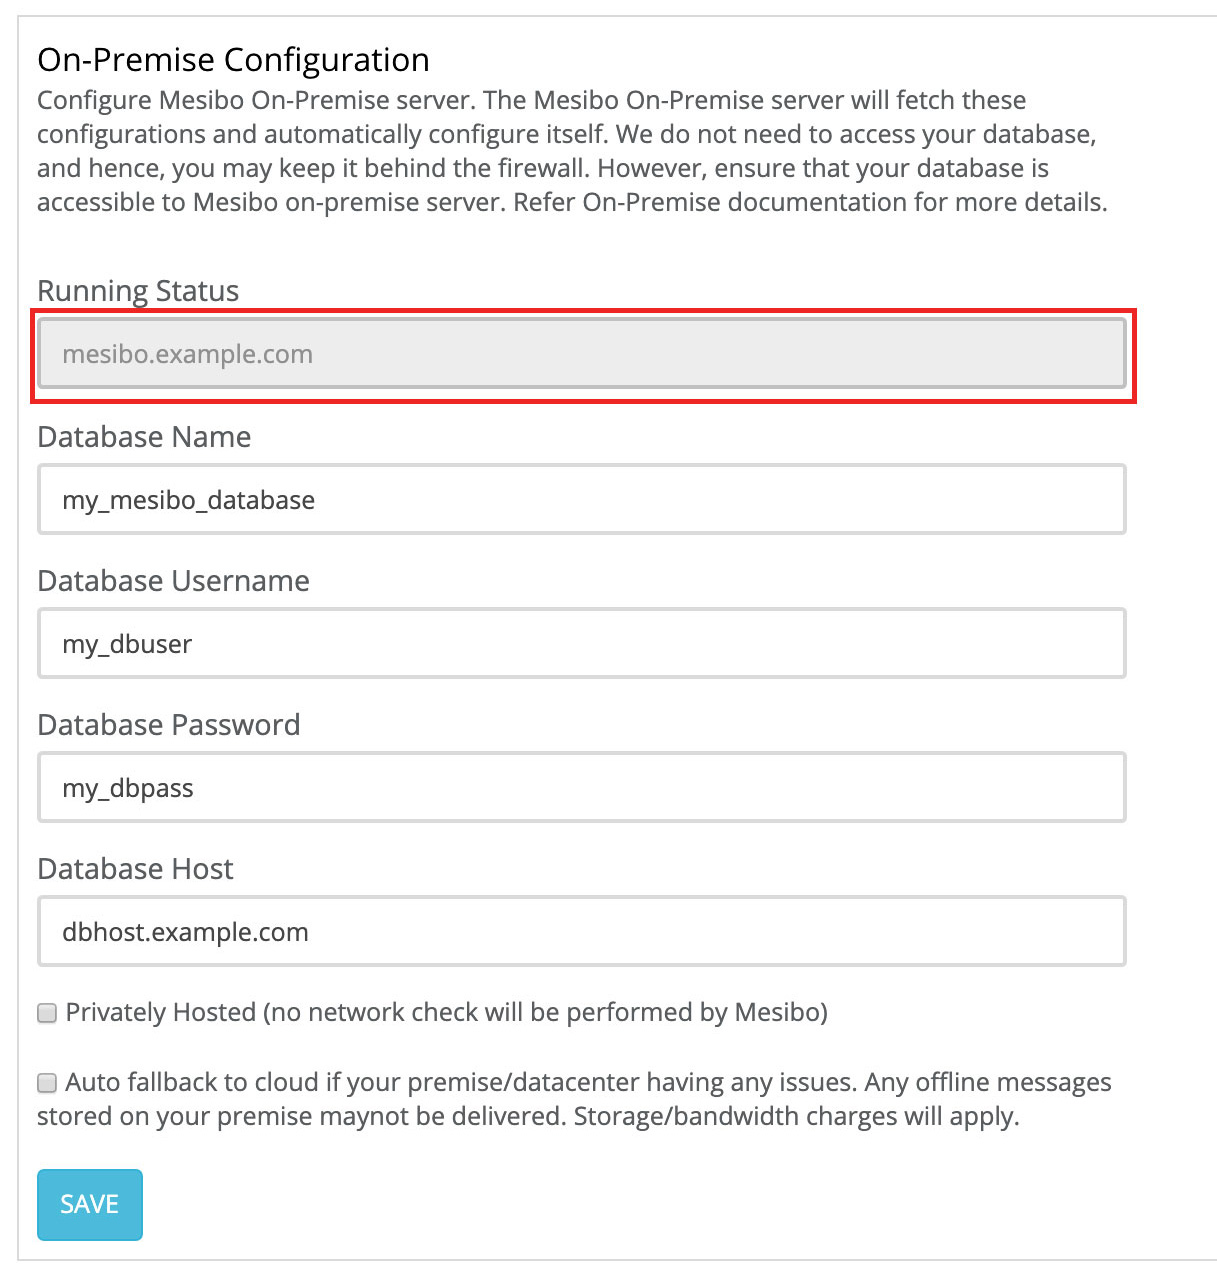
If your On-Premise server is setup properly continue with the next step, else refer to the Troubleshooting section below.
Step 5 - Enable On-Premise
Now, it's time to enable On-Premise from the console. Once you enable On-Premise from the console, all your users will be notified to use your On-Premise server instead of Mesibo cloud.
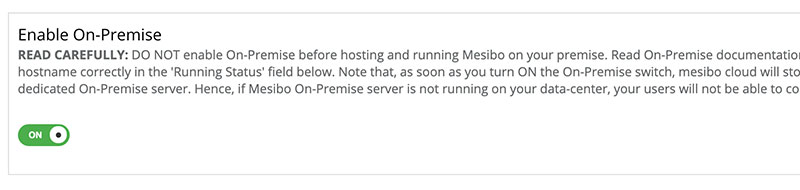
Turn on the On-Premise switch and your app users will start connecting to your On-Premise server immediately and you will start observing logs like following:
: login successful: root (uid xxxx) aid: (xxxx)
Congratulations! You are now UP with Mesibo running on your own premise.
Firewall Settings
Mesibo listens on TCP ports 513, 5222, 5223, 5228, 4443, 5443 and 8443. Ensure that these ports are open on your Linux host so that your users can connect to your On-Premise server. Mesibo on-premise also requires an outgoing connection to onp-auth.mesibo.com for authenticating and billing. Ensure that your firewall does not block it.
OPTIONAL - If you are also hosting mesibo backend API as described in the backend API section below, you MAY need to open your web server ports (80/443) for your internal usage. You will also need to allow outgoing connections to api.mesibo.com
In addition, if you are running mesibo live server for conferencing, your need to open ALL the UDP ports.
Depending on your Linux distribution, there are different ways to configure firewall, for example, to open port 5222, you'd issue the following command depending on your system:
- If your system has
firewall-cmd(Red Hat Enterprise Linux, CentOS, Fedora, and variants)
$ sudo firewall-cmd --add-port 5222/tcp
If your system has
iptables(Red Hat Enterprise Linux, CentOS, Fedora, and variants)$ sudo iptables -A INPUT -p tcp --dport 5222 -j ACCEPTIf your system has
ufw(Ubuntu, Debian, and variants)$ sudo ufw allow 5222/tcpIf you are running mesibo on-premise on public cloud like AWS or Google, go to respective services configuration tools to open there ports.
Chatbot and Scripting
Mesibo on-premise comes with a powerful chatbot & scripting engine that allows you to run custom Javascript to process each message your users are sending and receiving. You can create a JavaScript script that can carry out your own decision logic to process each message to create interesting chatbots and apps. Refer to Chatbot and Scripting Documentation to learn more.
If you are using Chatbot and Scripting with your on-premise deployment, you need to pass an additional command-line argument to specify the directory where on-premise can store javascript files.
-v <some folder>:/mesibo
Local Configuration
If you prefer not to share your database credentials on the mesibo console and instead like to configure it locally, you can create a configuration file /etc/mesibo/mesibo.conf and configure it as follows:
database {

	host=<db host>
	name=<db name>
	user=<db username>
	pass=<db password>
}
mesibo on-premise assumes that your database is listening on port 3306. If your database is listening on other port, you may specify it using a port parameter.
You may also specify other parameters. Note that configuration file has priority over command line parameters.
server {

	token=<app token>
	hostname=<host name>
	validate=<validate hostname>
}

ssl {
	path=<certificates path>
}
You still need to configure dummy database credentials in the
console. Anything you configure in/etc/mesibo/mesibo.confoverrides the console configuration.
You will also need to pass an additional parameter -v /etc/mesibo:/etc/mesibo to docker so that mesibo can access the configuration file.
Stopping On-Premise
To stop on-premise, get the CONTAINER_ID of the Mesibo docker container by using
$ sudo docker ps
Now, stop this container using CONTAINER_ID
$ sudo docker stop <CONTAINER_ID>
Or,
$ sudo docker stop mesibo
After stopping, you may use sudo docker ps to verify that it is stopped.
Updating Mesibo On-Premise Server
Always ensure that you have the latest version of Mesibo Docker Image running. To update your mesibo on-premise image, run:
$ sudo docker pull mesibo/mesibo
Once updated, stop the mesibo on-premise and then run again as explained above.
Command line arguments
mesibo takes a few command line arguments which you need to specify before the token.
- --hostname=
or -h , this is ignored if certficate has the host name - --private or -p if mesibo is deployed on a private network. No hostname or IP validation will be performed
Deploying with a Cloud Service Provider
All major cloud service providers support running docker containers. Hence you can easily run mesibo. However, you may need to configure the following:
If you are running a VM instance having the only private address, pass
-pparameter before the tokenYou must open all the required ports in the firewall settings in your providers control panel
To create an on-demand instance of Mesibo in the cloud, refer to respective documentation on running Docker containers :
Using Backend APIs with On-Premise
Since mesibo will NOT have any access to your on-premise setup or database, there are only limited operations (useradd, userset, and usertoken) you can perform with mesibo hosted
backend API when using on-premise. For all other operations like group management or sending messages, you will need to use real-time APIs, for example,
real-time group management APIs.
Alternatively (highly recommended), you can host entire backend APIs to your own server. This will enable you to access entire backend APIs while using mesibo on-premise. Even if you are not using backend APIs for group management or sending messages, it is highly recommended that you enable and use backend APIs bundled with mesibo docker image as it will update your database instantly and also give you access to additionals ops like usersget, groupsget, etc.
Hosting mesibo backend APIs
You can easily host entire backend APIs to your own servers as it is already bundled with mesibo docker image. You will only need to configure your webserver to access it.
mesibo backend API server is bundled with mesibo docker image as a FastCGI server so that you can configure it with any of your existing web servers. By default, mesibo on-premise will not launch the backend FastCGI server. To launch the backend FastCGI server, you will need to pass -b <port> option when starting mesibo on-premise. For example, the following command will start the mesibo on-premise and will also start the backend FastCGI server on port 5000.
$ sudo docker run -v /certs:/etc/letsencrypt/archive/mesibo.example.com --net=host \
	--ipc=host --name mesibo --rm -d mesibo/mesibo -b 5000 iqmr059ms2yopxhc2sayx05ba2l5cralockbicqjsvv1nsqxs0x1yclfv0qvyg1q
You should see in logs that the backend API server is started.
Once the mesibo on-premise and the backend server are started, you need to configure a URL on your webserver to access backend APIs. Any API request received on this URL should be forwarded to the mesibo backend FastCGI server at the port specified in the command, port 5000 in above example.
All the web servers (apache, nginx, lighttpd, IIS, etc.) support FastCGI. If you are using PHP or any other backend, you are already using FastCGI on your web server. Refer to your web server documentation to learn how to configure a URL and connect it to a FastCGI server.
Below is an nginx server example which tells server to create a virtual URL https://<your-web-server>/mesiboapi. Any request recieved on this URL will be forwared to a FastCGI server, in this case, mesibo backend API FastCGI server on port 5000.
location /mesiboapi {
	fastcgi_param SCRIPT_FILENAME $request_filename;
	include        fastcgi_params;
	fastcgi_pass   <your docker IP address>:5000;
}
Once configured, restart your webserver and open configured URL on your web browser. If configured successfully, you should see the following output on your web browser.
{"error":"MISSINGOP","result":false}Dynamically Loadable Modules and Scripting
Mesibo On-Premise is designed by developers for developers. Its dynamically loadable module architecture lets you load your own code for deeper integration with your infrastructure, enabling you for unlimited creative possibilities. This makes Mesibo, the most compelling real-time communication platform existing today.
We will soon publish a new tutorial on this topic.
Troubleshooting & FAQ
Although mesibo on-premise is simple to set up and run, below is a possible list of set up issues and commonly asked questions.
If your on-premise is not running, first check the logs and find the issue by running on-premise in the foreground by replacing -d by -it in the command line arguments as shown below:
$ sudo docker run -v /etc/letsencrypt/archive/mesibo.example.com:/certs --net=host \
	--name mesibo --rm -it mesibo/mesibo <APP_TOKEN>
Now check the logs. Some of the issues (for example, MySQL, networking, etc.) may require you to launch a shell inside the docker container bypassing the mesibo so that you set up independently without launching or involving mesibo.
You can enter the docker shell (bypassing mesibo) by running the following command, the mesibo will not be launched in this case.
$ sudo docker run -it --entrypoint /bin/bash -v /etc/letsencrypt/archive/mesibo.example.com:/certs \
        --net=host --ipc=host -v /etc/mesibo:/etc/mesibo mesibo/mesibo
You will be presented with a bash shell where you can enter regular Linux commands to troubleshoot various issues.
MySQL Issues
If you have trouble connecting to your MySQL server, you can directly use the mysql command from the docker shell to troubleshoot.
# mysql -h <dbhost> -D <dbname> -u <dbusername> -p
One common mistake is to specify localhost or 127.0.0.1 for the database host which generally does not work for the docker environment. You should specify the actual host or the IP address and your database should grant access to the user from the docker host or the IP address (and not the localhost). You can find a docker IP address using the ifconfig command.
Note that if
mysqlcommand can not access your database, then even mesibo can't since mesibo uses MySQL. You will find plenty of tutorials online (and also on stackoverflow) to debug your MySQL connection issues.
Certificate Issues
If you are having a certificate related issue, ensure that you have correctly followed all the instructions in Step 4 - Configuring TLS Certificate above.
If you are still having issues, enter the docker shell as explained above and try the following command.
# ls /certs
README  cert.pem  chain.pem  fullchain.pem  privkey.pem
You should see all your certificate files in the /certs folder. If not,
- Check folder for permissions issues, and the folder name passed using -v option.
- Ensure that folder you have passed is the real folder and not the link (symlink or hard link). This is especially true for Letsencrypt
livefolder which is a link, try usingarchivefolder instead (for example,/etc/letsencrypt/archive/example.mesibo.com). - Alternatively, try moving your files to a new folder with friendly permissions like 0755 and try using the new folder.
Note that If docker container can't access your files, then even mesibo can't since mesibo runs inside the docker container. We can not help you here. You will find plenty of tutorials online (and also on stackoverflow) that shows how to mount your folder on a docker container.
If you can see all your certificates, you can check the certificate validity by running the following commands
# cd /certs
# openssl x509 -in cert.pem -text -noout
This should print certificate info. Check CN and validity fields.

# openssl rsa -in privkey.pem -check
This should print valid key information
IP Address Mismatch
Ensure that you are running mesibo on-premise on a valid host. For example, if your domain name is 'xyz.example.com' and the IP address configured for your domain name in your DNS is '1.2.3.4', you need to ensure that the same IP address is configured on the host machine where you are running mesibo. mesibo on-premise checks for a valid IP address to ensure that the IP address matches the hostname (or the certificate host). mesibo on-premise will print an error and exit if the matching IP address is not found on your machine.
However, there are instances when you need to override it, say, in a VM setup (say, Google Cloud or Amazon EC2) where VM is running on a private IP, not matching with the actual host address. In such cases, you can disable the check using the -p option before the app token, as shown below. Note that your users will not be able to connect if you run mesibo on an arbit machine.
$ sudo docker run -v /etc/letsencrypt/archive/mesibo.example.com:/certs --net=host \
		-d mesibo/mesibo -p <APP_TOKEN>
Connection Issues
Ensure that your have configured the firewall as described in the Firewall settings above.
Other
On-premise server prints error(s) to show you the correct status even if it is "ready to connect". Try to connect a client if it is ready. If the client does not connect, check the incoming firewall (invariably an issue when running it on cloud providers like AWS, Azure, etc). You can also use netcat to check the connectivity.
$ netcat <IP> 5222
Contact Us
You can contact us with the result of all the above information if you still need help. Ensure to send the complete logs and describe what all have you tried. Note that, when you are running on-premise, we have absolutely no information about your setup. Hence, send us even trivial details like IP addresses (use ifconfig or ip addr), certificate details, commands you have tried, etc.
FAQ
For a more detailed FAQ section on On-Premise refer
I am currently using Mesibo Cloud services. If I enable On-Premise, how long will it take to switch connection to my server?
As soon as you enable On-Premise in the console, your users will start getting connected to your On-Premise server. Please ensure that you have made the necessary configuration in the console and the Running Status in console displays your hostname before you enable On-Premise.
Can I switch from Mesibo On-Premise back to Mesibo Cloud Service ?
Yes, if you would like your users to switch from On-Premise server to Mesibo cloud server, first disable On-Premise in the console and then stop your docker container which is running mesibo. Your users will now get connected to Mesibo Cloud.
I have enabled On-Premise and my server is running, how do I know if my app is connected to my server?
You can check the logs for your server using
$ sudo docker logs mesibo
When a user on your app logs-in, you'll get a login entry for that user.
What happens if I have enabled On-Premise and my server is not running?
There are two possibilities:
If
Auto Fallbackis not enabled and your server is not running and you have enabled On-Premise, your users will not be able to connect and hence will fail to get your service.If
Auto Fallbackis enabled and your server is not running and you have enabled On-Premise, your users will switch to Mesibo cloud after a few retries.
What happens if a user is connected to my server and I disable On-Premise from the console?
If your server is running, your users will continue to connect to your On-Premise server since they do not know about you disabling On-Premise server.
However, if you also stop your docker container running Mesibo, your users will be redirected to Mesibo cloud after a few retries and will connect there since you have disabled On-Premise.
Can I run Mesibo on a Cloud Service Provider?
All major cloud service providers support running docker containers. Please refer to respective documentation for different providers such as AWSopen_in_new, Azureopen_in_new, Google Cloudopen_in_new, etc.
I am confused between On-Premise Vs. Cloud offering, which one is better?
You can't go wrong with either model. While our Cloud service let you start immediately without installing anything, the On-Premise model offers ultimate flexibility, control of your data, loadable modules, interface with machine learning and AI tools and much more. The pricing is same, however, On-Premise model can work out more cost-effective as there are no charges other than per active user charges. On another hand, you pay for bandwidth and storage charges in our cloud offering.
Will the backend API URL change when I use on-premise?
No, the backend API URL will remain the same unless you have also hosted mesibo backend APIs. You can use the https://api.mesibo.com/backendopen_in_new even when using on-premise. When running on-premise, you only need to use backend APIs for creating users. For everything else, you can use real-time APIs.
Getting Error: MySQL Connection Failed - Can't connect to MySQL server in server logs
- Ensure that database host, name and credentials are correctly configured in On-Premise configuration.
- Ensure that you have granted the necessary permissions to access your database from the docker container.
- Check your database host firewall configuration and ensure that, it is configured properly for allowing connections from docker container.
Getting Error: Unable to verify app token - network error in server logs
Check your firewall configuration and verify that it is configured to allow connections from your docker container. Then, restart your docker container.